
Snow and Ice
Explore snow and ice in the comfort of your classroom with these fun and engaging sensory activities!
Shaving Cream Snow Trays

Shaving Cream Snow Trays
Use some polar/winter animals to bring these snow trays to life. Children will have a blast exploring the texture of shaving cream and playing with winter animals.
Just spray some foaming shaving cream on a tray, and let the kids explore. Add some plastic liners on your table for easy clean up.
How Animals Stay Warm

How Animals Stay Warm
Animals that live in extreme cold weather have adapted to survive there, despite the freezing temperatures. This activity is a great way to demonstrate how animals stay warm.
In a plastic bag, add a bunch of shortening, like Crisco, then put another baggie inside, and squish the shortening between the two bags. This will make a layer of shortening that will not make the kids hands messy as they put their hand into the bag.
Fill up a pitcher with ice water then place your blubber bag on one side. Have the kids put their hands on either side to see which side they can last longer on, and explain how the layers of blubber keep the animals from freezing in the ice.
Melted Snowman Puffy Paint Art

Melted Snowman Puffy Paint Art
Make a batch of puffy paint with 3 parts foaming shaving cream and 1 part white school glue. Fold gently together until you make a fluffy batter, then have the kids add eyes, carrot noses, sticks, and black circles for buttons and the mouth to make these hilarious melted snowman.
Ask the children why their snowman melted for some extra fun that will have parents laughing.
Kinetic Sand and Polar Animals

Kinetic Sand and Polar Animals
As you plan curriculum, keep in mind that any sensory substrate, like play-dough/kinetic sand, can be used with any theme you plan.
Turn your play-dough center into a winter animal exploration by adding some polar animals, gems, and recycled sticks to your sensory substrate. In this case we used kinetic sand, but you can use anything!
Snowy Scenes on the Easel

Snowy Scenes on the Easel
We always have an easel available in the classroom, and change out the tools and paint colors depending on the theme. For winter, we added blue and white paint for the children to paint a snowy scene.
Ice Buildings

Ice Buildings
Using some old Styrofoam and toothpicks, the kids will have a lot of fun building structures with “ice”. Let their imaginations run wild as they create icy buildings and castles.
Winter BINGO

Winter BINGO
BINGO is an awesome way to incorporate new vocabulary and images into your lessons. Being based in a synagogue allows us the opportunity to introduce the children to the Jewish culture. Throughout winter, we learn about Hanukkah, including the importance of the Menorah, dreidels, latkes, jelly donughts, and the Star of David.
We typically allow all the children to win bingo. We keep calling the cards until everyone gets BINGO, and once a child wins, they get to pick from the prize box. This way we all have fun and learn, and no one walks away with tears.
Popsicle Stick Snowflake Painting
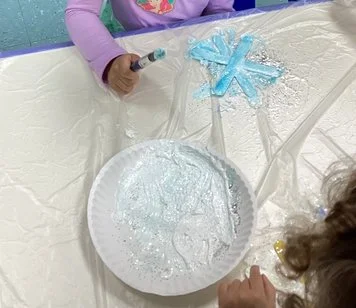
Popsicle Stick Snowflake Painting
Kids love making snowflake ornaments, and this one is easy to prep. Use some hot glue, or tacky glue, to put 3 wooden sticks together. Add some glue and paint onto a paper plate and mix with some sparkles and let the kids paint. This one is great for all ages, and if you do it before the holidays, makes a cute ornament to take home.
Ice Painting

Ice Painting
A classic Ice activity is ice cube painting. Add some paint into an ice cube tray, then fill with water and add a popsicle stick. No need to mix!
When you’re ready to use, pull them out of the freezer about 5 minutes beforehand so they start melting, then let the kids have fun spreading the ice paint all over their papers.
You can incorporate color mixing activities into the color scheme, such as mixing primary colors, or pick winter colors to match the winter theme. Either way, the kids love this activity.
Salt Snowflakes

Salt Snowflakes
Make some gorgeous rainbow snowflakes using salt.
Start by drawing a snowflake with some white glue, and cover it with salt. Let dry overnight, or use immediately (the results aren’t much different either way). For younger children, letting it dry is less messy, as the glue doesn’t stick to the paint brush as they paint.
Once you’re ready, use liquid watercolors to dab drops of color onto the snowflake, and watch the magic happen as the salt absorbs the color.
Paper Snowflake Bracelets

Paper Snowflake Bracelets
We don’t get snow where we live, so to bring some snow magic to our preschoolers, we cut out some snowflakes using a snowflake hole punch and spread them out around the playground. The kids had so much fun finding the snowflakes and putting them on their tape bracelets.
Mitten Challenge

Mitten Challenge
A fantastic fine motor challenge for students is scooping pom poms into color matching cups while wearing mittens. Have your students put the mittens on by themselves, then do the whole challenge while wearing the mittens. This helps children develop those important fine motor skills, and hand eye coordination. This activity is good for 2-5 year olds, and using some ice cream scoops adds in a bit of pretend play, which will have the kids engaged for a while.
Snowball Catapults

Snowball Catapults
Using the catapult instructions from our Simple Machines Unit, you can have a super fun snowball fight with some plush snowballs, or pompoms. Keep it simple by having the kids decorate their catapults with markers, then let them go crazy!
Counting Mittens

Counting Mittens
Cut out some mitten shapes, here we used foam sheets. You can use felt or card stock, or even plain paper and laminate it for longevity.
On the first mitten, add some gems or snowflakes, and on the other put the number and word that corresponds to the number of counters. The goal is to have your students count the gems and find the matching mitten.
For preschoolers, start with 1-10, and as they master the numbers, increase the complexity and have them count up to 20. You can also use these to practice simple addition and subtraction concepts.
Snowman Counting

Snowman Counting
This is a super simple activity to prep for your kids. Cut out and glue some snowmen to a paper, then add some numbers underneath. Have the kids glue on some cotton balls, or snowflake stickers, corresponding to the number under each snowman. This is a great activity for 2-4 year olds to help them with fine motor skills, math, and hand eye coordination.
Puffy Paint Igloos

Puffy Paint Igloos
Using a simple puffy paint recipe, 1 part glue to 3 parts shaving cream, have the kids spread out their puffy paint on an igloo. To add some complexity for older children, give them strips of paper and have them cut out squares to put on the igloo to make ice cubes. Sprinkle some glitter snow on top for the final look!
Snowman Names

Snowman Names
A fun activity that requires little prep are snowman names. Cut out some circles, stick hands, hats, and carrot noses and have the kids write their names on the snowballs. They need to count the letters in their names, count out the right number of snowballs, then once they write their letters they put the snowballs in the right order. They can add buttons or black dots to make the eyes or nose, or just use a black marker. For a challenge for 4-5 year olds, have them write their last names too!